
Adobe After Effects, Adobe’s motion graphic design tool for web, TV and film, may prove to be a bit too daunting for newcomers to this software. But don’t worry- after mastering the basic ideas; you will be able to design beautiful animations and special effects for your projects. The focus of this guide will be the first After Effects composition: importing files, using layers, animating, and applying effects.
Getting Started with Adobe After Effects
Creating and Importing Files
Step 1: Make and Set Up a New Composition
In Adobe After Effects the projects are known as compositions, but in this case a more commonly used term is comps. Begin by meeting the Welcome screen in which in the right column there is a button that says “New Composition”. If the desired program is already opened, go to the “Composition” tab and select “New Composition” or press Ctrl+N. A new window with the caption “Composition Settings” will pop out and this is where you get to have your composition setup.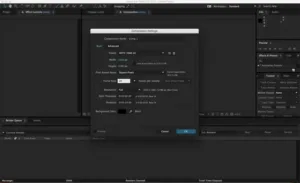
- Choosing the Right Resolution: Under “Preset”, online can converted web setting, standard definition broadcast setting NTSC/PAL, HD and movie/ film setting. For fowards compatibility, choose ‘UHD 8K 23. 976’; it is; four times the sample rate of 1080p HD at 23. 976 frames per second.
- Setting Duration: As for the “Start Timecode”, it should remain at 0. The “Duration” should be set to the needed time for the particular project.
Step 2: Save Your Composition
To do so, it is mandatory to name and save your project before you begin your work on it. Go to the menu and click on the word “File,” then navigate to the “Save” option on the drop down list, You will then be given a prompt to type in your compositions name on the “Save As” window. Navigate to a desired directory and then click on the “Save” button. You should store the file you are working on nearby the “Footage” folder within the “Exercise Files” folder.
Step 3: Import Files into Adobe After Effects
Animation for a particular song requires materials with which a composition can be created. You can import the files through the following process: select the option file, Confluence Import, and File or double-click on the Project tab. Select the files you would wish to import and click ‘Open’. Once the files have been imported they will be listed in the “Project” tab. However, click, anywhere on the “Project”, two times, or use, “Control + I”, or you can also drag images directly on the “Project”.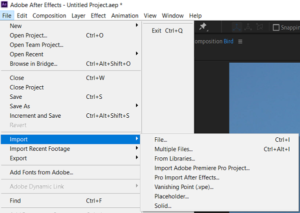
Building with Layers
Step 1: Add Files to Your Composition
A composition is a montage; it is a piece produced from layers. They are made of a file each, and every one of them is a layer. When writing a composition, to include a file, move the pointer into the “Project” tab and then, drop the file into the “Timeline” tab, or into the “Composition” window or into the “Layer” tab.
Step 2: Organize and Edit the Layers
About files’ management – when they are placed in the “Layer” tab, one can on them. It is possible to change the position of files within the list of items to the desired position, the position of which will affect the order of files in the composition. Change various aspects of a file by clicking the ‘Expand’ button next to the ‘Transform’ menu and then using the options such as Anchor Point, Position, Size, Rotation, and Opacity.
Step 3: Generate a Timeline for Your Composite Graphic
In this tool, the controls are drawn on the timeline layer of the graphic and enable the animator to determine the time when and which layer should appear. Each layer displays a life bar inside the timeline, although you can crop it, stretch it, or cluster it with other layers.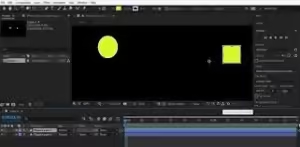
Step 4: Trim Your Layers
Right-click a layer and from the options, select to ‘trim’ or split a layer, simply move your cursor over the left line separating the list and a timeline while holding the left mouse button down and the pointer turns into two arrow pointer in the middle holding the pointer and moving to adjust this layer. To trim layers automatically you have to use Command + [ or Command + ].
Step 5: Transform Your 2D Layers
In the window of “Composition”, manually set the position or the transformation of layers. For instance, using the tools associated with a cited layer, you can move the layer up or down; shrink, expand, or rotate a layer by clicking on the layer’s handle. To move a layer, simply click and drag to a different position you are prefer with the help of the navigation bar.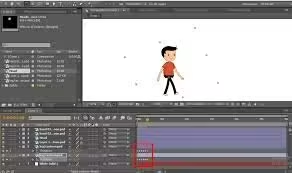
Step 6: Create 3D Layers
Other checked properties defining a 3D layer can be found in the “Layer” tab of the 3D settings column. In the “Composition” window, a handle of Y, X, and Z will be opened on the anchor of the layer.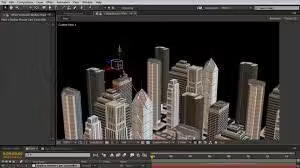
Step 7: Transform Your 3D Layers
Drag a 3D layer by selecting it, then hitting ⌘ Cmd together with W to get the rotate tool. Roll the layer to align the X or Y while ensuring that the Z value is set to 0.
Step 8: Put Your Layers Using the Parent Function
Connect the layers with the help of the parent function. Choose the child layer visible, go to the “Parent” field, and draw a line connecting the child layer’s curly-q symbol to the parent’s Layer Name area.
Animations, Effects, and Presets in Adobe After Effects
Step 1: Set Up Keyframes
It is from this point that keyframes are used to indicate specific instances of time when layer properties will have to change. Drag the red “Current Time Indicator” to the preferred point, choose a layer, open the corresponding pane – “Transform” or “Contents,” and click on the stopwatch button next to the needed property to define a keyframe.
Step 2: Animate Keyframes
Subsequently engage your project by changing property under the “transform” or “content” option. Position/JPEG 2000 Layer, the stopwatch will be located next to “Position”, click it and then put the red line to a different point to adjust the position of the layer.
Step 3: Include Effects and Presets
Other effects and presets can be applied by clicking on the menu bar->window->effects and presets. Effects that you put in your additional layer, can be dragged and placed on the effects list below the layer, and the changes in the layer appear immediately.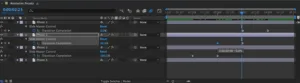
Previewing and Rendering
Step 1: Preview Your Project
Go to “Windows” > “Time Controls” to monitor your project before finalizing it. To preview a basic animation click play or for a slightly more refined animation click on ‘Ram Render Play’.
Step 2: Export Your Composition to Render Queue
To obtain high-quality output, choose the export to the render queue option. After that go on the option “File” > “Export” > “ADD TO RENDER QUEUE”. In “Output Module,” modify the output settings while the destination of the export in “Output To” should be also selected. Click “Render” to export.
Step 3: Export Your Composition to Adobe Media Encoder
To produce a compressed video, export the movie to Adobe Media Encoder. Open “File” > “Export” > “Add to Adobe Media Encoder Queue”. Expand the list “Preset Browser”, set a save location and press the green triangular button to proceed with export.
When you will follow these points you will be able to make outstanding compositions in Adobe After Effects. Happy animating!